
How to Install Kali Linux (Step-by-Step Beginner’s Guide)

Introduction:
Kali Linux is a powerful Debian-based distribution designed for ethical hackers, penetration testers, and cybersecurity professionals. In this guide, we’ll walk you through installing Kali Linux from scratch — whether you’re dual-booting, using a virtual machine, or installing on bare metal.
What You’ll Need:
- A computer (minimum 2GB RAM, 20GB storage)
- A USB drive (8GB+), or virtual machine software (like VirtualBox or VMware)
- Kali Linux ISO: https://www.kali.org/get-kali/
- (Optional) Balena Etcher or Rufus for creating bootable USB
Option 1: Install Kali Linux Using a Bootable USB
Step 1: Download Kali Linux ISO
- Visit https://www.kali.org/get-kali/
- Choose the version (Installer, Live, or NetInstaller)
- Download the ISO file (64-bit is most common)
Step 2: Create a Bootable USB
- Use Rufus (Windows) or Balena Etcher (Mac/Linux)
- Select your USB device
- Choose the Kali ISO you downloaded
- Start the process and wait until it’s done
Step 3: Boot From USB
- Plug the USB into the target machine
- Restart and enter BIOS/boot menu (F2, F12, ESC, or DEL depending on your system)
- Choose your USB device as the boot source
Step 4: Begin the Installation
- Select Graphical Install (or “Install” if you prefer a lightweight setup)
- Choose your language, location, and keyboard layout
Step 5: Configure User and Host Info
- Set hostname (e.g.,
kali) - Set domain (can be left blank)
- Create a user account and set password
Step 6: Partition the Disk
- Select Guided – use entire disk (or manual if you want more control)
- Choose whether to use LVM (Logical Volume Management)
- Confirm changes — WARNING: This will erase existing data if not dual-booting
Step 7: Install the System
- Let Kali install — this may take 10–30 minutes
- When prompted, install the GRUB bootloader
- Choose the correct drive (usually
/dev/sda)
Step 8: Reboot
- Remove your USB when prompted
- Your system should now boot into Kali Linux 🎉
Option 2: Install Kali Linux in a Virtual Machine (VirtualBox)
Step 1: Install VirtualBox
- Download from https://www.virtualbox.org
Step 2: Create New VM
- Name:
Kali Linux - Type:
Linux - Version:
Debian (64-bit)
Step 3: Allocate Resources
- RAM: Minimum 2GB (recommended 4GB+)
- Storage: 20GB virtual disk
Step 4: Attach the ISO
- In Settings > Storage, attach the Kali ISO as a virtual optical disk
Step 5: Start the VM
- Begin installation and follow the same steps as the physical install above
Conclusion:
Kali Linux is now installed and ready to use! Whether you’re learning cybersecurity or running penetration tests, Kali gives you access to hundreds of tools pre-installed. Make sure to run sudo apt update && sudo apt upgrade to keep your system up to date.
Related Posts

100 Essential PowerShell Commands for Windows 10 & 11 (2025 Edition)
🖥️ System Information & Performance Get-ComputerInfo — Displays detailed system information. Get-Process — Lists all…
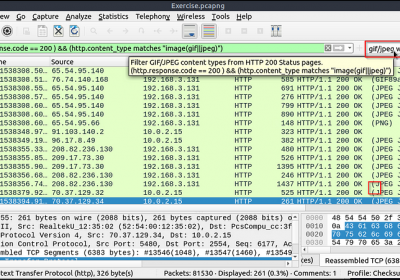
How to Set Up and Use Wireshark (With Real-World Examples)
Introduction:Wireshark is one of the most powerful and widely used network protocol analyzers in the…

How to Take Windows 11 Out of S Mode: A Step-by-Step Guide
If you’ve recently bought a new laptop or tablet running Windows 11, you might have…
Leave a Reply
You must be logged in to post a comment.