
How to Create a Bootable USB Drive for Windows 11
Introduction:
Whether you’re doing a clean install, upgrading from an older version, or troubleshooting a system, having a bootable Windows 11 USB drive is essential. This tutorial walks you through creating one using Microsoft’s free tools.
What You’ll Need:
- A USB drive (minimum 8GB)
- A working Windows PC
- An internet connection
Step 1: Download the Windows 11 Media Creation Tool
- Go to the official Microsoft site: https://www.microsoft.com/software-download/windows11
- Scroll to “Create Windows 11 Installation Media”
- Click Download now
Step 2: Plug In Your USB Drive
- Insert the USB into your PC
- Backup any data on it — it will be erased during the process
Step 3: Run the Media Creation Tool
- Open the file you just downloaded
- Accept the license terms
- Choose Create installation media (USB flash drive)
- Select language and edition (Windows 11 should be pre-selected)
- Choose USB flash drive when prompted
- Select your USB device from the list
- Click Next and the tool will download Windows 11 and create the bootable USB
Step 4: Safely Remove the Drive
- Once complete, wait for the “Your USB flash drive is ready” message
- Click Finish
- Eject the USB safely to avoid corruption
Optional: Test the USB Drive
To make sure it works:
- Restart your computer and enter the BIOS (usually F2, F12, Del, or Esc)
- Set USB as the primary boot option
- Save and restart — you should see the Windows 11 setup screen
Conclusion:
You now have a bootable Windows 11 USB ready for installation or repair. Keep it handy in case you need to reinstall or help friends and family with their PCs.
Related Posts

100 Essential PowerShell Commands for Windows 10 & 11 (2025 Edition)
🖥️ System Information & Performance Get-ComputerInfo — Displays detailed system information. Get-Process — Lists all…
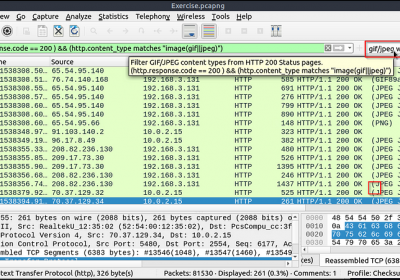
How to Set Up and Use Wireshark (With Real-World Examples)
Introduction:Wireshark is one of the most powerful and widely used network protocol analyzers in the…

How to Take Windows 11 Out of S Mode: A Step-by-Step Guide
If you’ve recently bought a new laptop or tablet running Windows 11, you might have…
Leave a Reply
You must be logged in to post a comment.